Marbling
- Kora Elizabeth
- Sep 16, 2020
- 3 min read

Updated: Sep 16, 2020
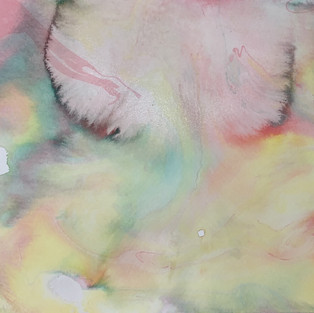
Turkish (Ebru) Marbling
The secret behind the beautiful designs of Turkish marbling is carrageenan. The water is separated from the carrageenan that is added and the surface of the water becomes viscous. There are multiple methods to adding paint atop the surface of the water, however I used a dropper directly into the liquid. Because the surface is thick, a stick can cut through the paint and move in the direction of the stick. Intricate designs are created, and adding colors makes the piece more interesting. I did not succeed the way I had hoped with this particular activity, at first it felt like I could not create the designs I wanted because it moved too much and was out of my control. Then there started to become a buildup of previously used colors in the liquid and the works became messier as I went along. I included an image of a piece that was created by attempting to remove the leftover paint, and although it looks messy, I think it has an attraction to it. I also used cloth in my marbling and it seemed to adhere best to the paint.


Pastel Marbling
Pastel marbling is very easy and can create gorgeous products. The type of pastel necessary are chalk pastels; we used chalk pastels with some oil included in them. First fill a tray with water, then use a knife to shave the sides of a pastel into the water, last place your paper in the water and see what it picks up! You can use whatever colors of pastels are desired in your marbling and create unique arrays of speckled color. One thing I noticed however, is that both sides of the paper are submerged in the water, and both sides are very different and unique. The side pressed into the water first displays a dotted effect similar to paint spatter, yet on the other side a wavier design appears. The second side looks most like the other techniques in marbling. I typically liked the backside of the pastel works better, but in order to achieve the look I desired I needed to add more pastel shavings into the water.


Suminagashi Marbling
Suminagashi marbling was the type of marbling that I had the least success in and could not manipulate at all. Essentially the process includes a tray of water, ink, and a thin ended paintbrush. The paintbrush moves the ink in a particular fashion and the ink spread out and is layered on each other. Perhaps I used too much ink, or dipping the paper into the paint was done poorly, there are many potential reasons as to why I did not succeed with this activity. But failing in this activity actually taught me a lesson in art. In some ways it is necessary to fail in artistic endeavors, because your creative mind can change and grow. After I had this failure, I sought to redeem myself with the next marbling task, shaving cream marbling.


Shaving cream marbling
The shaving cream marbling was likely my favorite kind of marbling that we tried. It involved using shaving cream, food coloring, cardboard, a paper plate and a thin pointed stick. I applied the shaving cream to the paper plate and applied a many drops of the variety of food coloring. Then I could use my stick to move the color around and create designs. After you create your desired design, apply a piece of paper and press it firmly into the shaving cream to pick up the food coloring with the paper. Afterwards, use the cardboard to scrape off the remaining shaving cream from the paper, and a design is revealed. I found this marbling technique to be the most rewarding in terms of what I hoped for in my final product. I found that the thickness of the shaving cream helped me create the designs I wanted and was much easier to manipulate.


Comments